Showing posts with label vegan. Show all posts

Sunday, October 21, 2012

Guest Post: Asparagus with vegan hollandaise.


Oh Anne... you had me at "vegan hollandaise"! Anne blogs about homemaking over at Domesblissity - check it out, it's got tons of wonderful ideas for recipes, craft and being a stay at home mum.


I'm Anne and I blog at Domesblissity. I'm a 48 year old SAHM of a girl aged (nearly) 8 and a boy aged (nearly) 6. I cook everything from scratch and make ends meet by making do. I'm sure I'm my grandmother reincarnated. When Stacey put the call out for guest posters to give her time to settle in with her new baby, I jumped at the chance. Although not a vegetarian, I love vegetarian food and use vegetables, grains and pulses a lot in my cooking for flavour, nutrition and, mostly, cost.  I love Stacey's recipes and have made quite a few.


I only buy seasonal produce and use what I have on hand. The asparagus looked beautiful when I did my fruit and vegetable shopping the other day and what goes perfect with asparagus? Hollandaise sauce. I did a bit of a browse online for vegan versions (not that I'm a vegan) and I found this one which uses soy milk and vegan margarine. This suited me perfectly as my sister had a huge cleanout of her pantry and gave me a couple cans of evaporated soy milk. I wondered what I could use them for.


The recipe is super easy and all done in a saucepan. (I was a little heavy handed with the turmeric so it's a little too 'yellow'.) It would be perfect served over any vegetables or a poached egg on spinach for breakfast. I think I might use this version all the time as I'm not a big fan of eggs anyway.


Friday, September 7, 2012

vegan banana + caramelised buckini bread with a bumper Loving Earth giveaway


I know some people believe banana bread should be frosted. I'm not usually one of those people.

I firmly believe banana bread should have a crunchy crust. And be free to eat plain or spread with whatever takes your fancy... like caramelised buckinis, say.

What's a buckini, you ask? I had the exact same question. Thankfully, the Loving Earth website isn't just a haven of deliciousness, it's also a haven of amazing superfood, and their descriptions of what everything is and how it is going to add a burst of health to your everyday are easy-to-read and useful. they also have tips on how to use it, if you're incredibly clueless like me.

These buckinis are made from buckwheat (which is apparently a fruit - who knew?!), which Loving Earth activate to make it easier for us to digest and retain the nutrients, and then flavour with agave, mesquite and cinnamon for a caramel flavour.

The website says to serve with your favourite milk and a bunch of other goodly things. I've heard people have them on yogurt, on porridge, on ice cream... and I have them on banana bread. They are lovely little crunchy morsels and breaking all the rules that say anything that is good for you can't taste good too.

This recipe makes a moist, dense loaf - not cakey, not bready but fabulously cinnamony and banana-y. It's sweet and goes well with a good strong cup of tea. I'm going to freeze extra for morning and afternoon teas, and it is a huge hit with my little gal.


Ingredients:
2 cups plain flour
3/4 cup sugar of your choice (anything non-refined is great)
1/2 cup Loving Earth Organic Coconut Sugar
1 tsp baking powder
1/2 tsp salt
1 tsp cinnamon
1/2 cup almond milk
1 tsp vinegar
4 large very ripe bananas, mashed
1/4 cup Loving Earth Raw Organic Coconut Butter/Oil
2 tbsp Loving Earth Raw Organic Light Agave Syrup
1 tsp vanilla extract
1/4 cup Loving Earth Organic Activated Caramelised Buckinis

Directions:

1. Preheat oven to 180C.

2. Mix milk with vinegar and let sit for a few minutes.

3. Add dry ingredients together.

4. Mix wet ingredients together and fold into dry.

5. Pour into a greased and floured 9x5inch loaf tin and sprinkle top liberally with caramelised buckinis.

6. Bake 1 hour, taking care to cover with foil if your buckinis are getting too brown. Bread is ready when a skewer inserted into the thickest part of the bread comes out clean.

7. Cool 10 minutes or so before turning out onto a wire rack. You will lose some buckinis, but don't worry!

If you don't eat that day, the buckinis get less crunchy but still delicious!

Recipe adapted from here.


Our thumbs up is still a work in progress. Thanks Uncle Benny!


And again, as ever - the funnest part!

As you may already know, I have been working with Loving Earth, creating recipes from their super-awesome products, trying them out here and then giving readers a chance to win the same ingredients I used in the recipes... and today is giveaway day!


In this pack, you get:

Loving Earth Organic Activated Caramelised Buckinis, 500g
Loving Earth Raw Organic Agave Syrup, Light
Loving Earth Raw Organic Maqui Powder, 15og
Loving Earth Organic Orange and Gubinge Raw Dark Chocolate, 100g
Loving Earth Activated Almond and Purple Corn Raw Dark Chocolate, 100g
Loving Earth Goji and Camu Camu Raw Dark Chocolate, 100g
Loving Earth Luvju a.f.a, goji and chia raw organic superfood bar, 50g
Loving Earth Luvju gubinge, camu and maca raw organic superfood bar, 50g
Loving Earth Luvju maqui, acai and cacao raw organic superfood bar, 50g
Loving Earth Luvju Coconut Mylk raw organic chocolate bar, 35g
Loving Earth Luvju Orange and Gubinge raw organic chocolate bar, 35g
Loving Earth Luvju Maqui raw organic chocolate bar, 35g
Loving Earth Luvju mint and a.f.a raw organic chocolate bar, 35g

All's you gotta do is leave a comment below telling us what you would create from at least two of these products. And don't worry - I won't steal your ideas, I promise! The recipe that gets us (i.e. me + Cormac from Loving Earth) drooling the most, wins. You don't need full recipes or photos or anything - just tell us what you would whip up. 


Competition closes Friday, September 14 at 5pm. Winner will be notified by email (so make sure you're contactable!) and announced on Facebook. You can enter as many times as you like. Entries are judged on creativity, and Judges' decision is final. I love you all.

The last lot of recipes were A-MAY-ZING so I can't wait to see what you come up with this time!

*Disclaimer: I contacted Loving Earth directly with this idea as I really wanted to work with them. They couldn't have been more friendly and willing to help. They generously gifted me two of each product that will be used over this series - one for me and one for you! That's all, folks...

Friday, August 31, 2012

Banana-berry smoothie with Loving Earth


So, as you already may know, I've been working with Loving Earth, making recipes from their amazing products and then GIVING THEM ALL AWAY!

Not the used ones, that would be mean. Brand new packages of goodness headed straight to you!

And let me tell you - this next prize pack is huge and awesome and is giving me second thoughts about having to let it out of my sight and out of my mouth. Methinks a shopping trip is in order.

Anyhow, we've been having smoothies here every day lately - its fun to sit outside in the sunshine and get messy with a fruity drink packed with goodness and health. Bananas and strawberries are super-cheap at the moment and we've just been keeping on top of the load I buy every week. Farmers markets FTW!


Did I mention messy? You should see her at the end!


Cup skills are getting better too!

Anyway, if you want banana-berry smoothie goodness in your life, here's what I do:

(makes 1 serve)

Ingredients:
1 large banana
handful strawberries
1 tsp chia seeds
1 tsp flax seeds
1/4 milk of your choice (I use soy, almond or rice)
1-2 tablespoons yogurt of your choice

Directions:

Blend like crazy until silky smooth.

*

I often use frozen berry blends, which are delicious and make the smoothie icy cold - and so do the bananas if you freeze them beforehand. Summer's going to be awesome!

If you're wondering what maqui powder is, it is considered the highest antioxidant berry on the planet, and is harvested from the Patagonian region of southern Chile. It has been used medicinally for thousands of years for a number of ailments and has a huge range of health benefits that the Loving Earth website outlines fabulously.

Don't forget to come back next Friday, September 7 for a brand-new recipe and the bumper giveaway! You WILL NOT want to miss it.


Monday, August 20, 2012

Meatless Monday - Roast veggie and herb fettuccine


This pasta was a lot of fun, as I got to use all of the delicious herbs that have been growing in my garden lately. (That reminds me - I need to do an update!) They really do pack a punch when cooking with tomatoes and zucchini and plain pasta, and I love that you can cater it to your own tastes and what you have growing in your own garden. I'm guessing this dish will never taste the same twice!

I also served it with some sourdough slices that I buttered, spread with garlic and salt and grated parmesan-style cheese over, and popped in the oven for a bit with the grill on - crispy, buttery, garlicky goodness! Especially nice with such a simple pasta.

This dish is so easy - all the veg and the sauce gets made in the one pan, which makes cleaning a breeze. I used fresh fettuccine because I like it better, but you can use whatever you like!

Serves 4.

Ingredients:
olive oil
4 red, ripe tomatoes cut in wedges
4 small zucchinis, cut in thick-ish rounds
1 eggplant, cut into small-ish dice (you want it to cook in time with the other things that are quicker)
assorted herbs to taste - I used fresh oregano, tarragon, rosemary, parsley and basil - and lots of them!
1/4 - 1/2 cup balsamic vinegar
1 tsp sugar
1 tsp dijon mustard
salt and pepper
fettuccine, cooked according to directions

Directions:

1. Preheat oven to 200C.

2. Pour a little olive oil in a baking tray and add veggies, tossing to coat.

3. Cook 20 minutes or so until tomatoes are just collapsing and other veg is picking up a little colour. You don't want the tomatoes to be complete mush, so keep an eye on it.

4. Remove from heat and add herbs. Mix balsamic with sugar, dijon, salt and pepper and pour over veggies, mixing gently with the oil at the bottom and any juices the veggies have given off during cooking.

5. Serve over fettuccine with fresh rocket or spinach or whatever you have in your garden on top.


Linky Bitz
♥ The linky will be up every Monday morning, and will stay up until the following Sunday. It doesn't matter if you eat your meal on a day other than Monday - it's just an easy day to create the link.
♥ Grab the Meatless Monday button above and put it in your post, and even on your sidebar if you're feeling generous!
♥ Visit at least one other blogger and leave some love. This is so much more cool if we're in it together!


Friday, August 17, 2012

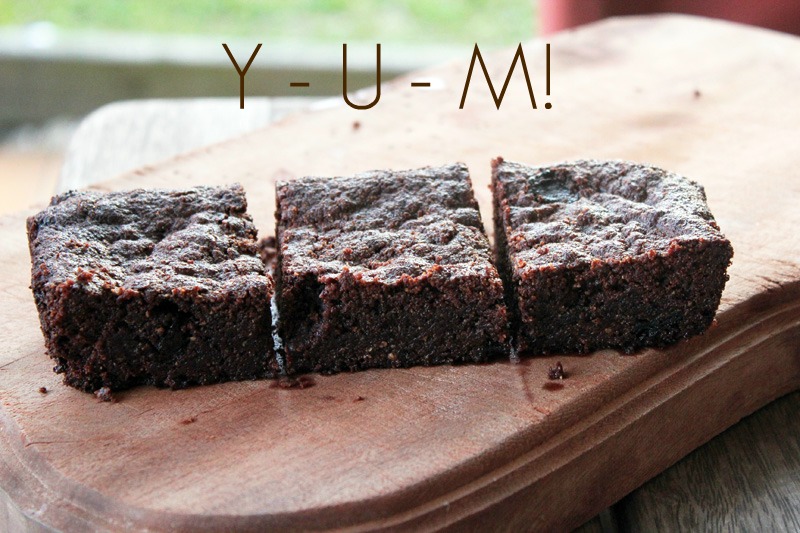
Vegan brownies with sour cherries, and a Loving Earth prize pack giveaway!


I have often thought about making vegan brownies but usually put it aside as it sounded harder than other vegan goodies - brownies have such a specific texture that I thought it would be somewhat difficult to replicate. Regular brownies are sort of crisp and chewy on the outside, with a dense, fudgy centre, and are not to be messed with.

I've done a lot of reading lately in an effort to make vegan brownies with a similar composition to regular brownies as opposed to cakey versions I've made in the past when purely veganising a non-vegan recipe. I don't like brownies that taste like cake - I want brownies to taste like brownies! So with a little experimentation I think I've nailed it - and they're not overly sweet, which I like. It sort of creeps up on you and the chocolate has the merest hint of coconut before the full choc flavour hits. To be honest, I am super-chuffed. I may or may not have called them the best brownies in the world... but you can be the judge of that. Maybe you like cakey brownies? If so, it's probably best to end our friendship here.

A couple of things I learned in my readings are that sugar is non-negotiable for non-cakey brownies, as the more you skimp, the less brownie texture you get. Also, the mix has to be really, really dry before you bake it - all things I hadn't really been concerned with before. So I made it drier and sugarier (but not using white sugar as it's not vegan, and instead using sugars that are naturally less sweet) than I normally would. I also tried out coconut oil instead of the usual vegan margarine I would use, and that totally hit the spot.


 It's not a batter as such, but a wet mix of ingredients. That I couldn't stop picking at, if I'm to tell the truth! You could even add some nuts along with the sour cherries - I would probably include Loving Earth's Organic Activated Walnuts.

Anyhow, enough with the chatter, on with the recipe:

Ingredients:
2 tbs flaxseed meal
6 tbs hot water
3/4 cup Loving Earth Raw Organic Coconut Butter
100g Loving Earth Organic Sour Cherry and Acai Raw Dark Chocolate
1 tsp vanilla
1/4 cup Loving Earth Raw Organic Sour Cherries
1 cup Loving Earth Organic Coconut Sugar (or use two full cups of this)
1 cup sugar of your choice depending on how sweet you want your brownies (I used rapadura)
3/4 cup cocoa/cacao powder
1 cup almond meal
1 cup plain flour
1 tsp salt
1 tsp baking powder
1 tsp baking soda

Directions:

1. Preheat oven to 180C.

2. Mix the flax meal and the water until thick, making a flax egg. Let sit for a minute or two.

3. Break the chocolate into pieces and add to a large bowl with the coconut oil. Melt in the microwave in short bursts - this shouldn't take long as the Loving Earth chocolate is a different compound than regular chocolate. Add vanilla.

4. Add flax egg and mix.

5. Add sugar, cocoa/cacao powder, almond meal, flour, salt, baking powder and baking soda. Mix until thoroughly combined.

6. Put into a 6x10 inch (or similar) brownie pan lined with greaseproof paper or foil, either work well. Spend some time pressing down reasonably firmly to ensure a good consistency when baked. Smooth the top - I used a rubber spatula.

7. Bake 20-30 minutes until a skewer comes out of the middle relatively clean when tested - the mix shouldn't be too wet. Take it out a bit earlier than you normally would to ensure a fudgy centre. It probably won't look cooked (mine didn't) but it's best to err on the side of caution and take it out once it's had 30 minutes.

8. Cool in pan until thoroughly cold so it won't crack when you cut into it.

9. Feel as chuffed as I do that you just made a damn good brownie.


And now for the even funner stuff!

As you may already know, I have been working with Loving Earth, creating recipes from their super-awesome products, trying them out here and then giving readers a chance to win the same ingredients I used in the recipes... and today is giveaway day!


All's you gotta do is leave a comment below telling us what you would create from at least two of these products. And don't worry - I won't steal your ideas, I promise! The recipe that gets us (i.e. me + Cormac from Loving Earth) drooling the most, wins. You don't need full recipes or photos or anything - just tell us what you would whip up. And if you didn't win this time? There's another coming up in a few weeks with MOAR chocolate and new ingredients!

In this pack, you get:

Loving Earth Raw Organic Coconut Butter, 500g
Loving Earth Organic Coconut Sugar, 300g
Loving Earth Organic Sour Cherry and Acai Raw Dark Chocolate, 100g
Loving Earth Organic Coconut Mylk Raw Chocolate, 100g 
Loving Earth Organic Macqui Raw Dark Chocolate, 100g
Loving Earth Organic Sour Cherries, 100g
Loving Earth Organic Activated Pumpkin Seeds, 100g

Competition closes Friday, August 24 at 5pm. Winner will be notified by email (so make sure you're contactable!) and announced on Facebook. You can enter as many times as you like. Entries are judged on creativity, and Judges' decision is final. I love you all.

Ok, hop to it - I am very much looking forward to seeing what y'all come up with - partly because I'm nosy, and partly because you guys are way more creative than me!

*Disclaimer: I contacted Loving Earth directly with this idea as I really wanted to work with them. They couldn't have been more friendly and willing to help. They generously gifted me two of each product that will be used over this series - one for me and one for you! That's all, folks...

Thursday, June 21, 2012

Kid snacks: date and coconut balls


Back when I was looking for portable, home-made snacks for Abby I went through the usual - slices, biscuits, etc and even though I could make them reasonably healthy, I couldn't make them last longer than a couple of days. I do freeze muffins and things and that helps, but I wanted something that was quick, small and very portable.

Enter date and coconut balls. I know there are recipes for other sorts with lots of ingredients, but I wasn't interested in that much faffing. One day I brought home some organic dates and organic coconut. I'm not usually that fanatic about organic stuff, but the bulk bins at my local health-food store are pretty much all organic so I go with that! Anyway, I figured I could work out the ratio at home.

Dutifully, I put the dates and the coconut in the food processor and.... nothing. hard lumps and nothing like the sticky mixture I was expecting. It appears those dates had pits and my experiment failed miserably! That is, until I cut out the pits, mixed the date and coconut mixture with apple and made a date and apple crumble, which I ate with a hell of a lot of cream, and Abby just mushed in her fingers and shoved in her mouth.

Next time I just grabbed a 500g bag of PITTED dates (duh), 1 cup of coconut, and mixed it in the food processor. I rolled the resulting mixture into little balls and rolled into coconut. What you see above is the quantity, which did Abby pretty well for about a week. They do last in an airtight container, so you might want to make more for larger families.


Although I wasn't sure how they would be received, her natural curiosity got the better of her and she didn't even wait until I had finished photographing them before she snatched one and got stuck in.

Yes I crawl around on the ground and take photos of food - it's the best light!

They were a HUGE hit. I can't even describe how excited she got every time she was offered one. And I'm like "dude, they're dates... what's to get excited over?" but she thought they were the best treats ever. We used them as insurance on the plane to Melbourne as we knew it would be a sure thing to get her to sit still and be reasonably quiet if all else failed. She was actually pretty manageable thank goodness, but every day during our trip we packed three in a box with some other snacks and they were the first to go. She would immediately cram one in her mouth and attempt to pick the other two up in one hand. Had to be holding all three at once. I was covered in date-flavoured spit most of the time. Classy.


Anyhow, they're now on constant rotation here, although I am cognisant of the natural sugars being quite concentrated and the fact that the dates can stick to her teeth so they're not an everyday thing. But damn, are they handy!

Wednesday, June 20, 2012

Easy peasy rice paper rolls


Sure these are super-simple, but if you've never made them before, you might shy away thinking they're too fiddly.

They're not. They're SO not.

All you need is a bit of bench space, some pre-sliced veggies and pre-soaked rice noodles and you're ready to roll. You could add anything you like to these babies, but I tend to stick to the tried-and-true carrot/cucumber/capsicum trio. I'm thinking next time of maybe adding some marinated tofu batons to give them a bit more oomph, but I truly love the fresh taste of crispy veg and am not usually in the mood to have it overshadowed.

Don't ask me to pop in non-marinated tofu. I'm just not ready.

Oh and the dipping sauce is the funnest part of this. You could mix together some soy, lime juice, brown sugar and chopped chilli with a little coriander/cilantro, or you could just smother them in kecap manis like we do and roll about moaning over how good it is. I'm really happy for you, and Imma let you finish, but sweet soy sauce is one of the greatest condiments of all time. OF ALL TIME.

Ingredients:

rice paper wrappers
rice noodles, soaked according to package directions
assorted veg, julienned
fresh herbs - I use coriander/cilantro and mint. And lots of it!

Directions:

1. I usually soak the rice paper wrappers in a shallow bowl of warm water until pliable. I also just saw on TV this is too much soaking, and you should just splash water on them and spread it around until it soaks in. I've not tried it, but it sounds good. Either way should be fine.

2. Line up your noodles, veg and herbs just a little ways up from the bottom of your wrapper, and away from the sides.

Like thus.

Then carefully fold the empty bottom part of the wrapper over the filling and gently fold in the sides. Don't be afraid to grip your contents fairly firmly with your fingers or you'll just squash the whole thing and end up wrapping it like Veggie Dad does. Don't do that.

Continue rolling, ensuring the sides are tucked in and press down the final edge to seal. I like to then rest it on the seal to help it stick together while I make the rest.

Et voila:

Dip. Eat. Moan. Make some more.

You know you want to.

Monday, June 18, 2012

Meatless Monday - Disney World Chili


I'm told this recipe is for the chili that is served at Columbia Harbor House, Magic Kingdom at Disney World. But you know, it's the internet. My ability to verify this is pretty much zero. So I didn't bother!

I found the recipe here and adapted it... like, they said to use 1.5 teaspoons of chopped jalapenos - I put in three whole peppers, chopped. I like it spicy. I also forgot the olives, like a complete douche, but loaded it up with all the good stuff like cheese and avocado and ate it with corn chips. It was beany, but not too beany, and the chopped veggies helped with that. Overall, not a bad standby! I put mine in the crockpot (all but the canned beans) and it was perfect by dinnertime. I also soaked and boiled some black beans because they're hard as hell to get in cans around here. I added them a little earlier than the canned beans to help soften them.

Here is my crockpot recipe, but there's nothing stopping you from doing it on the stovetop. Unless you don't have a stovetop.

Serves: 6-8

Ingredients:
Olive oil
1/4 cup diced red bell pepper/capsicum
1/4 cup diced green bell pepper/capsicum
1/2 cup diced celery
1/2 cup diced red onion
1/4 cup diced carrot
1/2 cup sliced mushrooms
2 cloves garlic, minced
1/2 tsp thyme
1/2 tsp oregano
1 tsp cumin
chopped jalapenos and chili powder (or cayenne, I used all three), to your desired heat
1/4 cup tomato paste
1 cup corn kernels (fresh is best)
2 cans mixed beans
1 cup soaked and boiled black beans
1 can kidney beans
1 can diced tomatoes
1 tomato can water
1 pinch sugar
1 tablespoon cornflour/cornstarch mixed with 1 tablespoon water

Directions:

1. Saute the peppers, onions, mushrooms, celery, carrot and garlic in olive oil over a medium-high heat 15 minutes or until brown and caramelised. This helps with flavour in the crockpot, but  you can throw them all into the pot uncooked if you're pressed for time.

2. Add to the crockpot with spices, jalapenos, corn, tomatoes, water, and sugar.

3. Cook on low heat 8 hours or high heat for 4.

4. Two hours before serving, add black beans. 

5. An hour before serving, add canned beans.

6. Prior to serving, you can thicken the mixture with the cornflour/cornstarch and water mixture.

7. Serve topped with sour cream, avocado, cheese, salsa or keep it vegan. 

Linky bitz...

♥ The linky will be up at 9am every Monday morning, and will stay up until the following Sunday. It doesn't matter if you eat your meal on a day other than Monday - it's just an easy day to create the link


♥ Grab the Meatless Monday button above and put it in your post, and even on your sidebar if you're feeling generous.


♥ Visit at least one other blogger and leave some love. This is so much more cool if we're in it together

Where it says "Name", you might like to add the name of your dish instead or as well.