Showing posts with label baking. Show all posts

Friday, November 9, 2012

Guest post: Spanakopita


One of my favourites! Cooked by the wonderful Jac at CRAP Mamma. Not read her blog? You are MISSING OUT. Get over there. She cracks me up. xo


Coming from Greek heritage (well half of it is anyway, the other half are a mixture of German-English-Aussies), food tends to be central to all get-togethers, celebrations and just life in general. Whilst I don’t always cook from a Greek menu at home, there are a couple of traditionally Greek recipes that frequent our dinner table. Spanakopita is one of those. Apart from the pastry, I love that it’s relatively healthy, with protein and omegas from the eggs, a decent dose of vitamin C and iron from the spinach and not-to-mention a hit of calcium from the yummy addition of feta cheese.

I also love the versatility of this recipe and in all honesty, every single one of my spanakopitas has a different flavour depending on what I’ve ‘tweaked’ that day. Depending on your tastes, you might like to replace baby spinach for silverbeet or even leeks. The feta can be Greek or Danish (both have very different textures and flavours) and if you like a smoother texture and flavour you can add a small tub of ricotta to the feta mix. The herbs are fairly flexible too; I used mint for this one but you can replace it with dill or use a mixture of both depending on what you like. It’s a simple recipe that you can make according to your own family’s tastes. Don’t be afraid to play with the filling because it’s a pretty forgiving mix.

Enjoy and yassou x


Spanakopita (spinach and feta pie)
Serves 4-5
Ingredients
250g fresh baby spinach
400g good quality feta cheese
1 onion
3 cloves garlic
6 eggs (plus one for an egg wash).
4-5 sheets store bought frozen puff pastry (traditional spanakopita uses filo pastry but I find it too fiddly and time consuming, not-to-mention the additional fat content…)
Juice of 1 lemon
1-2 tablespoons chopped mint
Couple of tablespoons olive oil

Method
1. Lay out pastry sheets on bench to thaw.

2. In a heavy-based frypan or wok heat sauté onion and garlic in olive oil until transparent. Add baby spinach and sweat down until just cooked. Remove from heat.

3. In another large bowl lightly whisk eggs then add crumbled feta and mint. Add cooled spinach mix to egg-slush and mix gently.

4. Line base and sides of 20x30cm(ish) lasagne tray with pastry making sure the bottom is completely sealed.

5. Pour filling onto base and spread evenly (don’t worry if it looks a little watery, that means your pie will be nice and moist).

6. Top with the last of your pastry, brush with a little egg-wash, prick some holes in the top and pop into oven for about 45 mins or until the pastry is evenly browned.

You can eat this immediately or serve cold. This recipe freezes well too.


About Me: 
Jacqui likes to write, cook and drink coffee and when she’s doing none of those, she’s usually running around outside the house with chook poo between her toes trying to land a water-balloon on one of her 3 crazy boys. Jacqui blogs over at CRAP Mamma where she talks all things kids, family, cooking and just CRAP (Creative Relaxed Approach Parenting) in general. 

Tuesday, October 9, 2012

Guest Post - Pumpkin Loaf AND Cheesy Stuffed Pumpkin! Bonus.


Hey everyone!
Now, I know you have swung by today to check out Veggie Mama’s blog and right now you are probably thinking ‘who the hell is this Veggie Imposter?’ So let me introduce myself – my name is Emily and I’m visiting from over at Love Shoes and Cupcakes.

Today we are going to talk pumpkin and things are going to get a little crazy and a little messy so tighten your seat belts and just enjoy the ride!

Pumpkin would have to be one of my favourite vegetables because it’s just so versatile and lends itself to so many fantastic dishes like a gorgeous curry, a fully loaded quiche or even a salad. And do I even need to mention it works beautifully as a side whether you roast it, boil it, mash it or grill it? I think not. Basically what I’m getting at here is that you can do such a wide variety of things with pumpkin and in an effort to fully explore its versatility today we are not going to look at just one easy and delicious pumpkin recipe, but two! And while we are living dangerously I thought we would make one sweet and one savoury…..

Too much?

Bear with me….

The first recipe I have for you today is this Pumpkin Loaf. 


Now I know there are people out there, like my husband – Mr B, who are firmly against the whole pumpkin used in baking theory but I have to say that this very recipe completely changed my tune on pumpkin related baking. Whether you have it warm or cold, plain or with butter, this recipe is packed full of flavour and I’m even going to go out on a limb and say I prefer it to the humble banana bread. So if you are looking for something suitable for lunch boxes, morning teas, after school snacks or even breakfast, give this a go!

You will need:
650g butternut pumpkin peeled and deseeded 
100g softened butter
1 1/2 cups light brown sugar 
2 eggs 
2 cups self-raising flour 
1/2 teaspoon bicarb soda 
1 tspn ground cinnamon 
1 tspn mixed spice 
1/2 teaspoon ground ginger 

Preheat oven to 180°C and line your loaf tin with grease proof paper. 
Cut the pumpkin into 4cm pieces and place in a microwave safe dish. Microwave on HIGH (100%) for 3 to 4 minutes or until pumpkin is tender. Mash until smooth and set aside to cool. 
Using an electric mixer, cream the butter and sugar together.
Add eggs, beating until well combined. 
Add pumpkin, flour, bicarb and spices. Beat on low until just combined.
Pour mixture into your prepared tin and smooth surface. 
Bake for 50 to 55 minutes or until a skewer inserted into the centre comes out clean. Stand in pan for 10 minutes before inverting onto a wire rack.


Ok so we have done the crazy part – now let’s get messy with this Whole Baked Stuffed Pumpkin. Mr B and I made this for my parents the night before we left on our honeymoon and it was a huge hit!


You will need

1 large pumpkin
100g diced mushroom
1 onion diced
1 stick celery diced
150ml extra light thickened cream
2 cups grated cheese (I used a combination of gouda, romano, cheddar and parmesan, but plain cheddar would be fine too)
1/2 cup breadcrumbs
1 tspn Gourmet Garden Mediterranean Seasoning (which is a mix of basil, garlic, oregano and bell peppers)
Salt and Pepper

Pre-heat oven to 180C. 
Place your pumpkin on a tray and cut the top off. Scoop out all the seeds to create a nice round hollow but make sure you still have a nice thick shell as well. Soak the stalk in some water whilst preparing the filling. 
In a lightly oiled fry pan over medium heat, combine the mushrooms, onion and celery. Cook for 7-10 mins or until onion is cooked and celery is softened. 
In a bowl combine the mushrooms, onion, celery, cream, cheese, breadcrumbs and herbs. Season with salt and pepper. 
Spoon the filling into the hollowed out pumpkin. Don't be afraid to cram it all in there. Place the lid back on and pop the whole thing in the oven for around 90 mins. If you can insert a skewer into the skin and through the pumpkin with ease, then it is cooked. If not, give it another 30 mins and see how it goes then. 
When we cut the first slice out, the filling just sort of oozed out and it looked (and tasted) amazing!
There are so many different filling possibilities from rice to risotto to chilli to cheesey goodness! I’m interested to know, if you were making a stuffed pumpkin – what would you fill it with?


Thank you for reading my ramblings and I hope I have given you some inspiration to get in the kitchen, turn the music up and get your bake on!  
Mrs B xx

Friday, September 7, 2012

vegan banana + caramelised buckini bread with a bumper Loving Earth giveaway


I know some people believe banana bread should be frosted. I'm not usually one of those people.

I firmly believe banana bread should have a crunchy crust. And be free to eat plain or spread with whatever takes your fancy... like caramelised buckinis, say.

What's a buckini, you ask? I had the exact same question. Thankfully, the Loving Earth website isn't just a haven of deliciousness, it's also a haven of amazing superfood, and their descriptions of what everything is and how it is going to add a burst of health to your everyday are easy-to-read and useful. they also have tips on how to use it, if you're incredibly clueless like me.

These buckinis are made from buckwheat (which is apparently a fruit - who knew?!), which Loving Earth activate to make it easier for us to digest and retain the nutrients, and then flavour with agave, mesquite and cinnamon for a caramel flavour.

The website says to serve with your favourite milk and a bunch of other goodly things. I've heard people have them on yogurt, on porridge, on ice cream... and I have them on banana bread. They are lovely little crunchy morsels and breaking all the rules that say anything that is good for you can't taste good too.

This recipe makes a moist, dense loaf - not cakey, not bready but fabulously cinnamony and banana-y. It's sweet and goes well with a good strong cup of tea. I'm going to freeze extra for morning and afternoon teas, and it is a huge hit with my little gal.


Ingredients:
2 cups plain flour
3/4 cup sugar of your choice (anything non-refined is great)
1/2 cup Loving Earth Organic Coconut Sugar
1 tsp baking powder
1/2 tsp salt
1 tsp cinnamon
1/2 cup almond milk
1 tsp vinegar
4 large very ripe bananas, mashed
1/4 cup Loving Earth Raw Organic Coconut Butter/Oil
2 tbsp Loving Earth Raw Organic Light Agave Syrup
1 tsp vanilla extract
1/4 cup Loving Earth Organic Activated Caramelised Buckinis

Directions:

1. Preheat oven to 180C.

2. Mix milk with vinegar and let sit for a few minutes.

3. Add dry ingredients together.

4. Mix wet ingredients together and fold into dry.

5. Pour into a greased and floured 9x5inch loaf tin and sprinkle top liberally with caramelised buckinis.

6. Bake 1 hour, taking care to cover with foil if your buckinis are getting too brown. Bread is ready when a skewer inserted into the thickest part of the bread comes out clean.

7. Cool 10 minutes or so before turning out onto a wire rack. You will lose some buckinis, but don't worry!

If you don't eat that day, the buckinis get less crunchy but still delicious!

Recipe adapted from here.


Our thumbs up is still a work in progress. Thanks Uncle Benny!


And again, as ever - the funnest part!

As you may already know, I have been working with Loving Earth, creating recipes from their super-awesome products, trying them out here and then giving readers a chance to win the same ingredients I used in the recipes... and today is giveaway day!


In this pack, you get:

Loving Earth Organic Activated Caramelised Buckinis, 500g
Loving Earth Raw Organic Agave Syrup, Light
Loving Earth Raw Organic Maqui Powder, 15og
Loving Earth Organic Orange and Gubinge Raw Dark Chocolate, 100g
Loving Earth Activated Almond and Purple Corn Raw Dark Chocolate, 100g
Loving Earth Goji and Camu Camu Raw Dark Chocolate, 100g
Loving Earth Luvju a.f.a, goji and chia raw organic superfood bar, 50g
Loving Earth Luvju gubinge, camu and maca raw organic superfood bar, 50g
Loving Earth Luvju maqui, acai and cacao raw organic superfood bar, 50g
Loving Earth Luvju Coconut Mylk raw organic chocolate bar, 35g
Loving Earth Luvju Orange and Gubinge raw organic chocolate bar, 35g
Loving Earth Luvju Maqui raw organic chocolate bar, 35g
Loving Earth Luvju mint and a.f.a raw organic chocolate bar, 35g

All's you gotta do is leave a comment below telling us what you would create from at least two of these products. And don't worry - I won't steal your ideas, I promise! The recipe that gets us (i.e. me + Cormac from Loving Earth) drooling the most, wins. You don't need full recipes or photos or anything - just tell us what you would whip up. 


Competition closes Friday, September 14 at 5pm. Winner will be notified by email (so make sure you're contactable!) and announced on Facebook. You can enter as many times as you like. Entries are judged on creativity, and Judges' decision is final. I love you all.

The last lot of recipes were A-MAY-ZING so I can't wait to see what you come up with this time!

*Disclaimer: I contacted Loving Earth directly with this idea as I really wanted to work with them. They couldn't have been more friendly and willing to help. They generously gifted me two of each product that will be used over this series - one for me and one for you! That's all, folks...

Friday, August 17, 2012

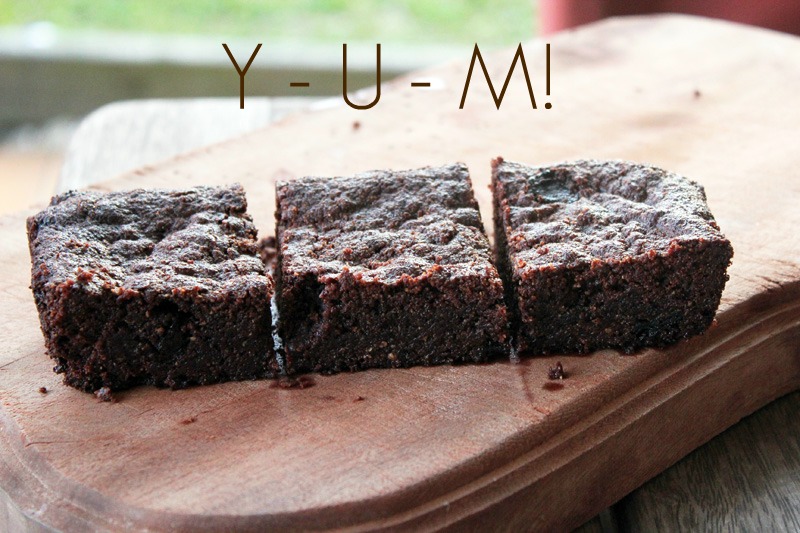
Vegan brownies with sour cherries, and a Loving Earth prize pack giveaway!


I have often thought about making vegan brownies but usually put it aside as it sounded harder than other vegan goodies - brownies have such a specific texture that I thought it would be somewhat difficult to replicate. Regular brownies are sort of crisp and chewy on the outside, with a dense, fudgy centre, and are not to be messed with.

I've done a lot of reading lately in an effort to make vegan brownies with a similar composition to regular brownies as opposed to cakey versions I've made in the past when purely veganising a non-vegan recipe. I don't like brownies that taste like cake - I want brownies to taste like brownies! So with a little experimentation I think I've nailed it - and they're not overly sweet, which I like. It sort of creeps up on you and the chocolate has the merest hint of coconut before the full choc flavour hits. To be honest, I am super-chuffed. I may or may not have called them the best brownies in the world... but you can be the judge of that. Maybe you like cakey brownies? If so, it's probably best to end our friendship here.

A couple of things I learned in my readings are that sugar is non-negotiable for non-cakey brownies, as the more you skimp, the less brownie texture you get. Also, the mix has to be really, really dry before you bake it - all things I hadn't really been concerned with before. So I made it drier and sugarier (but not using white sugar as it's not vegan, and instead using sugars that are naturally less sweet) than I normally would. I also tried out coconut oil instead of the usual vegan margarine I would use, and that totally hit the spot.


 It's not a batter as such, but a wet mix of ingredients. That I couldn't stop picking at, if I'm to tell the truth! You could even add some nuts along with the sour cherries - I would probably include Loving Earth's Organic Activated Walnuts.

Anyhow, enough with the chatter, on with the recipe:

Ingredients:
2 tbs flaxseed meal
6 tbs hot water
3/4 cup Loving Earth Raw Organic Coconut Butter
100g Loving Earth Organic Sour Cherry and Acai Raw Dark Chocolate
1 tsp vanilla
1/4 cup Loving Earth Raw Organic Sour Cherries
1 cup Loving Earth Organic Coconut Sugar (or use two full cups of this)
1 cup sugar of your choice depending on how sweet you want your brownies (I used rapadura)
3/4 cup cocoa/cacao powder
1 cup almond meal
1 cup plain flour
1 tsp salt
1 tsp baking powder
1 tsp baking soda

Directions:

1. Preheat oven to 180C.

2. Mix the flax meal and the water until thick, making a flax egg. Let sit for a minute or two.

3. Break the chocolate into pieces and add to a large bowl with the coconut oil. Melt in the microwave in short bursts - this shouldn't take long as the Loving Earth chocolate is a different compound than regular chocolate. Add vanilla.

4. Add flax egg and mix.

5. Add sugar, cocoa/cacao powder, almond meal, flour, salt, baking powder and baking soda. Mix until thoroughly combined.

6. Put into a 6x10 inch (or similar) brownie pan lined with greaseproof paper or foil, either work well. Spend some time pressing down reasonably firmly to ensure a good consistency when baked. Smooth the top - I used a rubber spatula.

7. Bake 20-30 minutes until a skewer comes out of the middle relatively clean when tested - the mix shouldn't be too wet. Take it out a bit earlier than you normally would to ensure a fudgy centre. It probably won't look cooked (mine didn't) but it's best to err on the side of caution and take it out once it's had 30 minutes.

8. Cool in pan until thoroughly cold so it won't crack when you cut into it.

9. Feel as chuffed as I do that you just made a damn good brownie.


And now for the even funner stuff!

As you may already know, I have been working with Loving Earth, creating recipes from their super-awesome products, trying them out here and then giving readers a chance to win the same ingredients I used in the recipes... and today is giveaway day!


All's you gotta do is leave a comment below telling us what you would create from at least two of these products. And don't worry - I won't steal your ideas, I promise! The recipe that gets us (i.e. me + Cormac from Loving Earth) drooling the most, wins. You don't need full recipes or photos or anything - just tell us what you would whip up. And if you didn't win this time? There's another coming up in a few weeks with MOAR chocolate and new ingredients!

In this pack, you get:

Loving Earth Raw Organic Coconut Butter, 500g
Loving Earth Organic Coconut Sugar, 300g
Loving Earth Organic Sour Cherry and Acai Raw Dark Chocolate, 100g
Loving Earth Organic Coconut Mylk Raw Chocolate, 100g 
Loving Earth Organic Macqui Raw Dark Chocolate, 100g
Loving Earth Organic Sour Cherries, 100g
Loving Earth Organic Activated Pumpkin Seeds, 100g

Competition closes Friday, August 24 at 5pm. Winner will be notified by email (so make sure you're contactable!) and announced on Facebook. You can enter as many times as you like. Entries are judged on creativity, and Judges' decision is final. I love you all.

Ok, hop to it - I am very much looking forward to seeing what y'all come up with - partly because I'm nosy, and partly because you guys are way more creative than me!

*Disclaimer: I contacted Loving Earth directly with this idea as I really wanted to work with them. They couldn't have been more friendly and willing to help. They generously gifted me two of each product that will be used over this series - one for me and one for you! That's all, folks...

Friday, July 6, 2012

Brown sugar, vanilla and pear filo bites


Lately I've become almost obsessed with using up food I would normally throw out. It's a good habit to get into and I've always done it to a degree, but now it's getting ridiculous. Being poor really helps cement that practice in one's kitchen ways, but when I grew up and had more money I got complacent. Now I try to remind myself that just because I can buy some more, doesn't mean I should. Or it doesn't mean I should not try to make use of that which isn't perfect.

I've always made quick little apple pies out of puff pastry scraps, but when I went to make a veggie filo the other day, my filo had all broken into long strips and was probably only useful for making a mess. Although working with filo makes me want to rock silently in a corner and suck my thumb, I persevered and tried to salvage what I could.

I mixed one pear, diced very small, with a dash of vanilla extract and a sprinkle of brown sugar. I took the long pieces of filo, peeled a couple of layers off, and put a teaspoon of the mix at one end. I then folded the corner over, and kept folding the bundle until it made a reasonably neat little triangle at the other end.

You can brush these with whatever you like, or leave them unbrushed, but I used egg for some and milk for others. I baked at 180C until golden brown.

I totally then ate the lot, after dipping into a bowl of cream. Don't judge me.


Anyway, as far as salvaging that which would normally be discarded, this is one of my more delicious outcomes. No complaints here!

Thursday, May 10, 2012

Homemade rye bread


Damn do I love me some homemade bread. And to be honest, once I got into a rhythm of it, I didn't feel like it was much work at all - even though for years I thought it was.

Never mind the fact that I loathe getting my hands dirty, and kneading bread falls firmly into "getting my hands dirty" territory. It's like scones - the work is so worth it in the end! I've been making it more and more lately because I kept buying it from farmer's markets for $5 a loaf when I knew full well I could make good bread, and for a fraction of the cost. I just kept telling myself it was too much work, even though I know it's not.

Explain that logic, someone.

Lately I've been eating it with a LOT of organic salted butter. Sometimes a little local honey. often with my homemade strawberry jam. Sometimes with peanut butter and the aforementioned honey. Sometimes with vegemite, or homemade pesto, or whatever else takes my fancy.

But always with the butter. So much butter. Except not with the peanut butter because that is WEIRD AND OH MY GOD WHY WOULD YOU DO THAT?

I'm looking at YOU, Beth Babymac. Weirdo.

Anyway. The bread. Do it. It's not much work, it's a hell of a lot of reward, and did I mention the butter?

The b.u.t.t.e.r.

Ingredients:
1 7g sachet yeast
1 tbsp sugar
1/4 cup warm water
2.5 cups white flour
1/2 cup wheatgerm
1 cup rye flour
1 tbsp olive oil
pinch salt
1 cup warm water

Directions:

1. Mix yeast, sugar and 1/4 cup warm water in a cup and leave to ferment for 5-10 minutes.

2. Add flours and salt to a bowl. Pour in olive oil and yeast mix.

3. Add the 1 cup warm water and mix until it starts clumping together, then turn out onto a floured surface and with floured hands, knead for 10 mintues. Add flour as necessary, I find this one's a little sticky.

4. Pat into a ball and place in an oiled bowl with a tea towel over the top.

5. Put somewhere warm - I put mine in the sun or on the stovetop if I'm preheating the oven. Leave to rise for at least an hour.

6. Punch down the dough and give another quick knead. I hate dirtying my bench again, so I either do it in the bowl or squeeze it just between my hands for a couple of minutes. It seems to work ok!

7. Put it in your tin or on a greased baking tray. Leave half an hour or so for a second rise.

8. Brush top with milk if you like and place in a hot oven - I do more than 200C at least to help it do any more rising and get a nice crust. Bake 30 minutes or so.

9. I leave to cool in the tin for a bit and then place on a wire rack.


I find it keeps for a couple of days just even out on the bench. It's dense, but a nice dense and makes great toast. The crust is awesome and so crispy. Exactly what I like in bread.

You could always add more rye, or substitute the wheatgerm for either more rye or more white flour. I just throw it in because I bought a big jar of it and don't want it to go to waste! I work on the basis of 4 cups flour.


Second rise... looks like bread. WIN!!